Create Validator with Custom Identity Provider
This page explains how to create a Canton Validator using an external Identity Provider (IdP) instead of using Catalyst’s integrated Keycloak. In this mode, Catalyst does not create users or OAuth clients for you; all required OIDC clients and users must be set up in your IdP before creating the validator, in accordance with the Canton Validator OIDC requirements.
Main Info
|
The alternative to creating a validator using Custom Authentication is using an Integrated Keycloak that automates the process as detailed in Create Validator With Integrated Keycloak |
This is a brief overview on how to set up Clients and Users in your Identity Provider before setting up the Validator. For a full description of requirements consult the Canton Validator OICD requirements.
|
The sections on secrets and other configuration on Kubernetes can ignored be as Catalyst creates them. When creating a validator, the clients and users need to be set up beforehand. |
Clients
The following clients are used by a Validator node, they need the proper flow allowed in your Identity provider.
|
It is recommended to allow all audiences for the clients during validator creation. These can be restricted later, once Catalyst has generated the required URLs, which can then be reviewed and applied. |
Validator Component |
Open Id Flow |
Fields required by Catalyst |
Validator |
Client Credentials Grant |
Client Id, Client secret |
Canton Name Service |
Authorization Code |
Client Id |
Wallet |
Authorization Code |
Client Id |
Users
Before setting up the validator, create a user in your Identity Provider and ensure this user has permission to use the OIDC clients created for the validator.
|
This user will be mapped to the main Validator party and will receive rewards, these can be viewed from the Wallet. |
Set up a validator
To set up a Validator, go to the Validators tab and click on the Set up validator button to open a side window.
1 - Main settings configuration:
At the first step of the new Validator setup wizard, please provide the following information:
-
Sponsor SV Name
-
Name
-
Onboard secret
-
Image tag
-
Image repo
-
Image pull secret
-
Scan address
-
SV sponsor address
-
Party hint
-
Migration id
More info about these fields
-
Sponsor SV Name The name of the Super Validator that sponsored you to join the network
-
Name The identifier or label for the validator node.
-
Onboard secret pass phrase obtained form the super validator in order to join the network.
-
Image tag The specific version or tag of the container image to be used.
-
Image repo The repository where the container image is stored.
-
Image pull secret Credentials required to pull the container image from a private registry. (secret docker-registry)
-
Scan address The address used for scanning and retrieving validator-related data.
-
SV Sponsor Address The URL of the SV app of the super validator sponsoring you. Typically provided by your SV sponsor and starts with "https://sv.sv-N" (N being a number).
-
Party hint Used as a prefix for the Party ID of your validator’s administrator. Must follow the format: <organization>-<function>-<enumerator>, e.g., myCompany-myWallet-1.
-
Migration id Used to track database migrations. The migration ID starts at 0 for the initial deployment and increments by 1 with each migration.
|
For further details, expand to the collapsible "More info about these fields" sections. |

| An onboarding secret should be requested from your sponsoring SV in order to join the network. |
| Only turn on the Restore participant identities toggle on if you want to restore a validator from an Identity Dump. |
2 - Set up your cluster configuration
At the second step of the Validator setup wizard, please provide the following information:
2.1 - Enable or disable each of the following fields:
-
Disable wallet
-
Fail on app version mismatch
-
Disable probes
2.2 - Fill in the fields:
-
Default JVM Options
-
Top up
-
Enable
-
Min Top up interval
-
Target throughput
-
Contact point
-
|
Make sure to set the Custom Authentication flag on. |
2.3 - Fill in the custom authentication fields:
-
CNS Client Id
-
Wallet Client Id
-
Ledger API Client Id
-
Ledger API Client Secret
-
Ledger API User
-
Wallet User
-
Audience
More info about these fields
-
Disable wallet Turn this on to not deploy a wallet UI with your validator.
-
Fail on app version mismatch If enabled, the deployment will fail if there is a mismatch between the validator and network application versions.
-
Disable probes Probes test the health of a deployment. In standard scenarios, it is recommended to not disable them.
-
Default JVM Options Default configuration options for the Java Virtual Machine (JVM) running the validator.
-
Top up Top-up enables or disables the validator’s automatic traffic purchase mechanism. When enabled, the validator monitors its available traffic balance and automatically buys additional network traffic when the balance falls below a calculated threshold.
-
Min Top up interval Defines the minimum amount of time that must pass between two automatic top-ups.
-
Target throughput Specifies the desired average traffic rate, expressed in bytes per second, that the validator aims to maintain for sequenced traffic.
-
Contact point Specifies where the validator can be reached for operational or administrative communication, such as alerts, notifications, or coordination related to validator operation.
-
CNS Client Id Client for the Canton Name Service
-
Wallet Client Id Client for Wallet application
-
Ledger API Client Id Client for Validator
-
Ledger API Client Secret Secret part of Client Credentials Grant Flow for the Validator client
-
Ledger API User User of the components described above
-
Wallet User User that will access the wallet application and receive rewards
-
Audience Audience claim expected by the clients

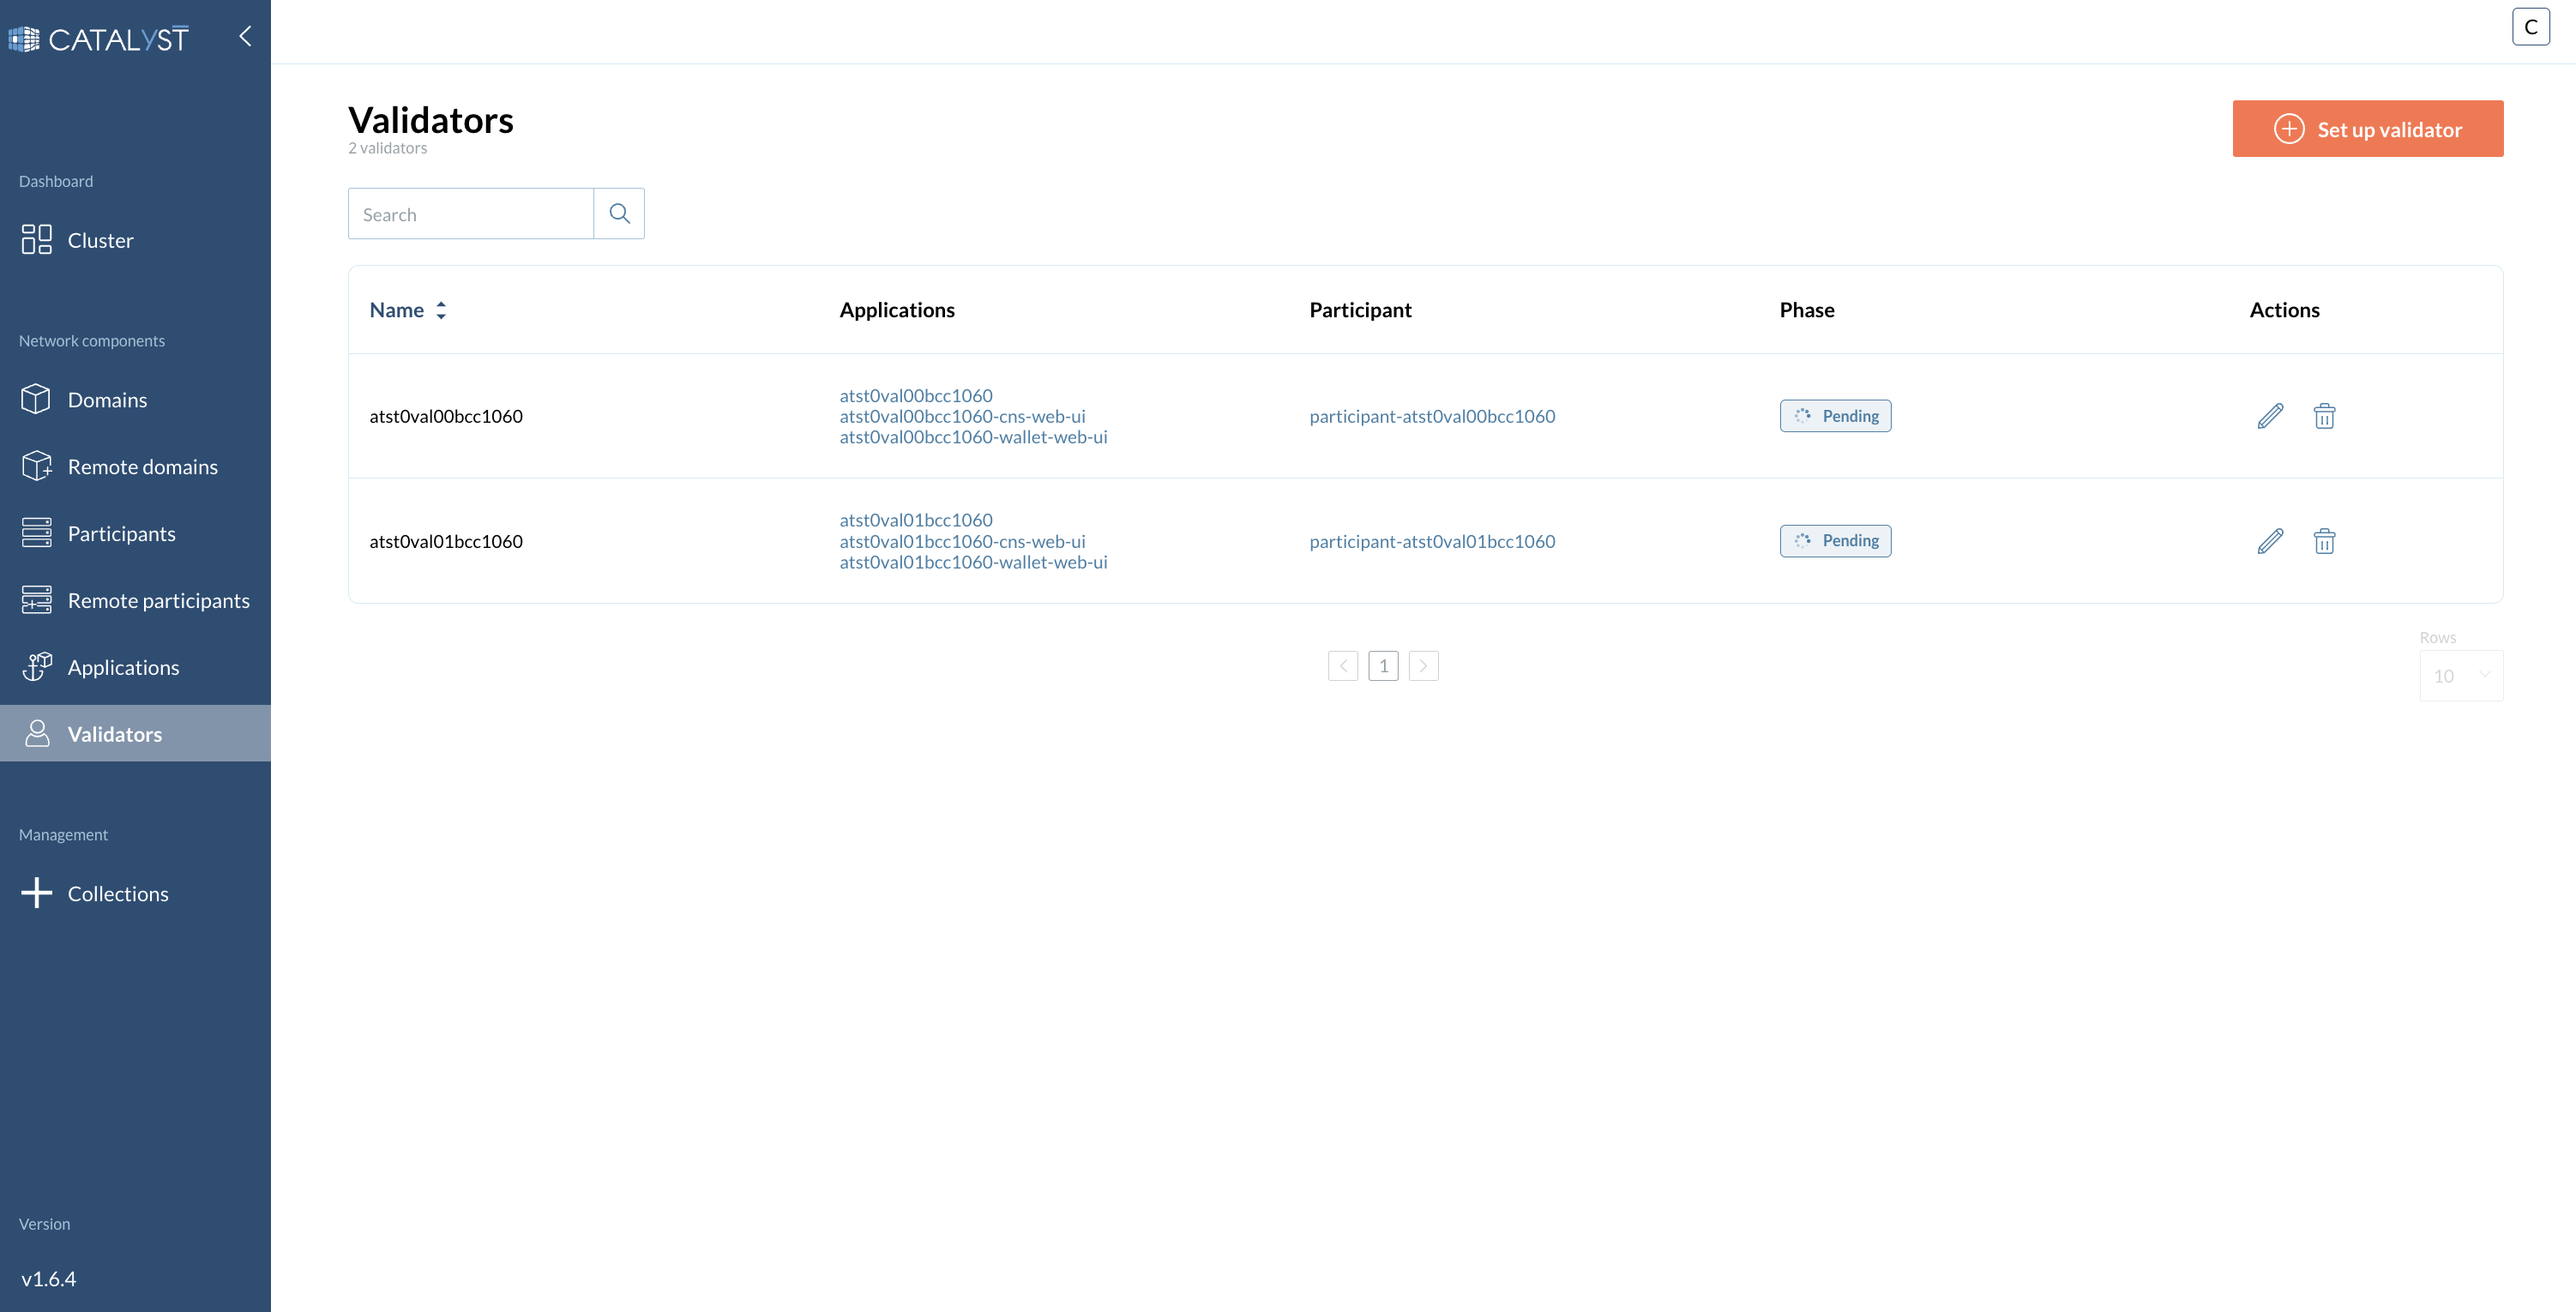
3 - Set up your cluster participant configuration
At the third step of the Validator setup wizard, please provide the following information:
-
Node Identifier
-
Enable or disable
-
Expose Ledger API
-
Private JSON API
-
-
Default JVM Options
More info about these fields
-
Node identifier - A unique identifier for the validator node within the network.
-
Expose ledger API - Open up GRPC Ledger API to the outside
-
Private JSON API - Close JSON Ledger API (open by default)
-
Default JVM Options - Default configuration options for the Java Virtual Machine (JVM) running the validator.
3.1 - Database Type
Choose whether to have a PostgreSQL database created automatically, or connect to an external database of your choice, then provide the required configuration details:
-
PostgreSQL
-
Database User
-
Database Password
-
-
External Database
-
Database User
-
Database Password
-
Host/IP address
-
Port number
-
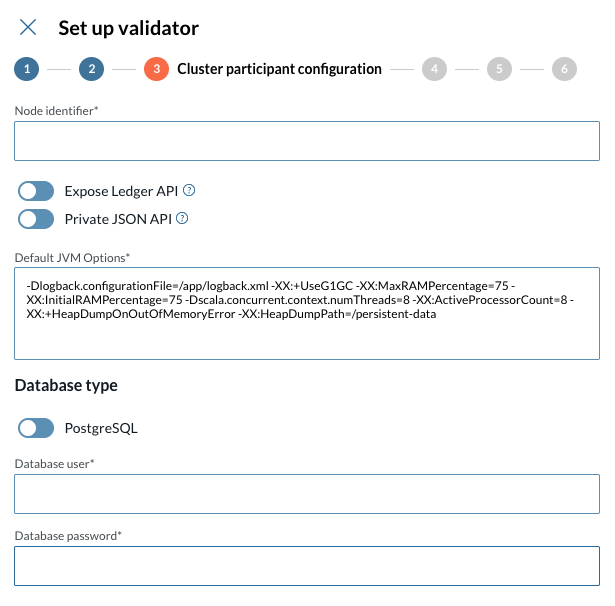
4 - Configure Resources
At the fourth step of the Validator setup wizard, configure the necessary resources by providing the following information:
-
Requested CPU
-
CPU limit
-
Requested memory
-
Memory limit
-
Replicas
More info about these fields
-
Requested CPU The minimum amount of CPU resources requested for the validator node.
-
CPU limit The maximum amount of CPU resources the validator node is allowed to use.
-
Requested memory The minimum amount of memory requested for the validator node.
-
Memory limit The maximum amount of memory the validator node is allowed to use.
-
Replicas The number of instances of the validator node to run.
|
The pre-filled figures for the resource configuration are a standard recommendation. Please adapt to your unique scenario if needed. |
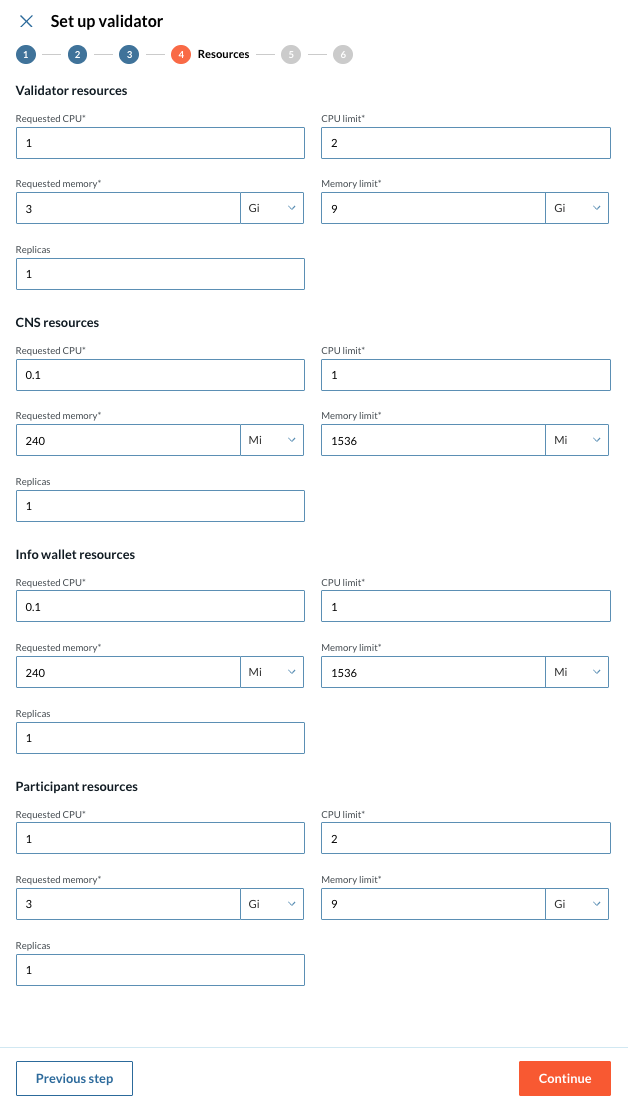
5 - Configure environment variables
At the fifth step of the Validator setup wizard, you can override the values of the environment variables created during the wizard configuration for the following components:
-
Participant node
-
Validator backend
-
Canton Name Service UI
-
Wallet UI
More info about these fields
-
Participant node The node that interacts with the Canton ledger on behalf of participants.
-
Validator backend The backend service responsible for validating and processing transactions within the network.
-
Canton Name Service UI The user interface for managing and viewing Canton network names and identifiers.
-
Wallet UI User interface for interacting with the wallet associated with your validator.
|
This is a very specific configuration, if you are not sure about this step, please contact IntellectEU. |
Identity and Access management
In deployments where an external Identity Provider (IdP) is used instead of Keycloak, your organization is responsible for managing user credentials and access controls for the validator infrastructure.
| We strongly recommend updating the password for this user account after the initial setup to ensure that access remains secure and unique. |
Resetting the Wallet User Password in Your Identity Provider
To change the password for the wallet user, please refer to the official documentation for your IdP. Look for instructions under user management or credential reset.
Typical steps include:
-
Log into your Identity Provider’s admin portal.
-
Locate the user account associated with the validator, for instance ($VALIDATOR_NAME_walletuser).
-
Initiate a password reset or manual update from the user management section.
-
Disable any temporary password flags if you want to use the new password directly.
-
Update any validator configuration files or services that use this credential.
| Always ensure that the new credentials are stored securely and reflect across all dependent components. |
| If your IdP integrates with federation or SSO, it is a good idea to ensure policies and password propagation are correctly applied. |
|
For reference, here are some helpful links to common IdP documentation: |