Installation Instructions
Prerequisites
1. Setup Kubernetes or OpenShift cluster
|
Supported version of Kubernetes: 1.21 and later. We recommend AWS (EKS) or Google Cloud (GKE), but you can install it on a standalone cluster as well. |
Define your cluster size considering the following minimum requirements and your business needs:
-
Minimal requirements for the Catalyst Package Manager for 1 instance with:
-
2 core CPU
-
4GB RAM
-
10GB disk space
-
-
Other prerequisites: Canton Participant node, Canton Domain (optional). Minimal requirements for one node:
Node |
CPUe |
Memory, Gi |
Storage, Gi |
Domain |
1 |
1 |
1 |
Participant |
1 |
1 |
1 |
Application |
1 |
1 |
1 |
|
Deciding on the size of the cluster, please consider the expected load of the nodes and increase these values accordingly. |
2. Install Helm to your workstation
Installation manuals: helm.sh/docs/intro/install/
No customization is needed.
| Supported version of Helm: 3.X. |
3. Install Traefik ingress
The ingress-controller is needed for traffic routing to expose nodes (domains & applications). The Catalyst Package Manager creates a CRD resource (IngressRoute in case of using Traefik), that is automatically started and deleted along with each application (and on demand for domains).
Installation manuals: github.com/traefik/traefik-helm-chart
No customization is needed, the default port ( :443 ) for HTTPS traffic will be used.
| We recommend installing Traefik to a separate namespace from the application (creation of a namespace for the Catalyst Package Manager is described in step 6). |
|
Supported version of Traefik: 2.3. |
4. Install cert-manager to create TLS certificate
TLS certificate is needed for secured communication between a User and the Сatalyst Package Manager components.
Installation manuals: cert-manager.io/docs/installation/helm/
We recommend using the last release of the official helm chart.
|
You can skip this step and specify your TLS certificate and key as a Kubernetes secret in Helm chart values instead later (Helm chart values are described in the Setup section). You can find the manual on how to create a Kubernetes secret here: |
5. Install Keycloak as your identity provider
|
Our product integrates with Keycloak for authentication and authorization. Since Keycloak is an external system with its own setup and configuration requirements, we recommend that you first consult the official Keycloak documentation for detailed instructions on installation, configuration, and advanced usage. |
-
Configure Keycloak
-
Create a User
-
Create a dedicated user:
cpm-${client} -
Set a password for this user in the Credentials tab
-
-
Create a Client
-
Create a new client cpm-cli with the following configuration:
-
Authentication flow:
OAuth 2.0 Device Authorization GrantandDirect access grants -
Root URL and Home URL: leave empty
-
-
Add
daml_ledger_apias a Default type scope -
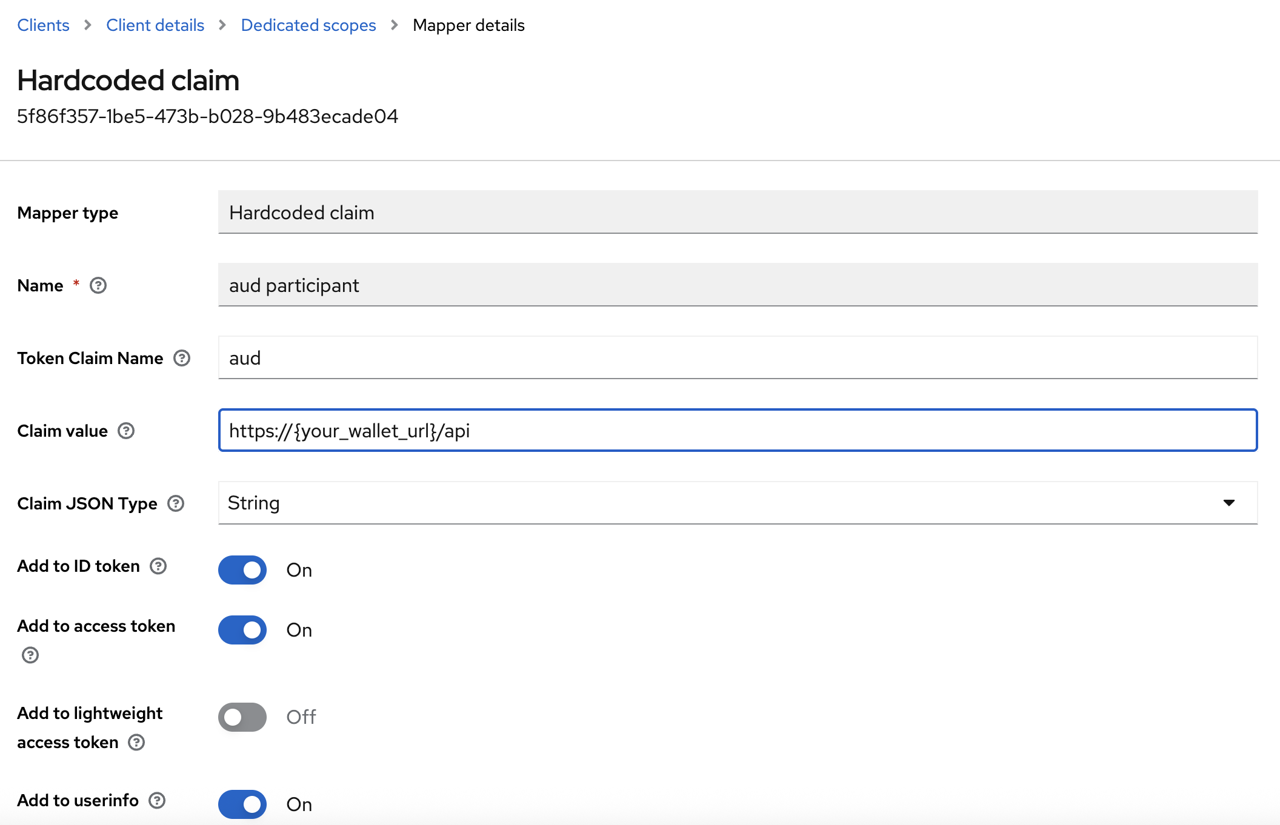
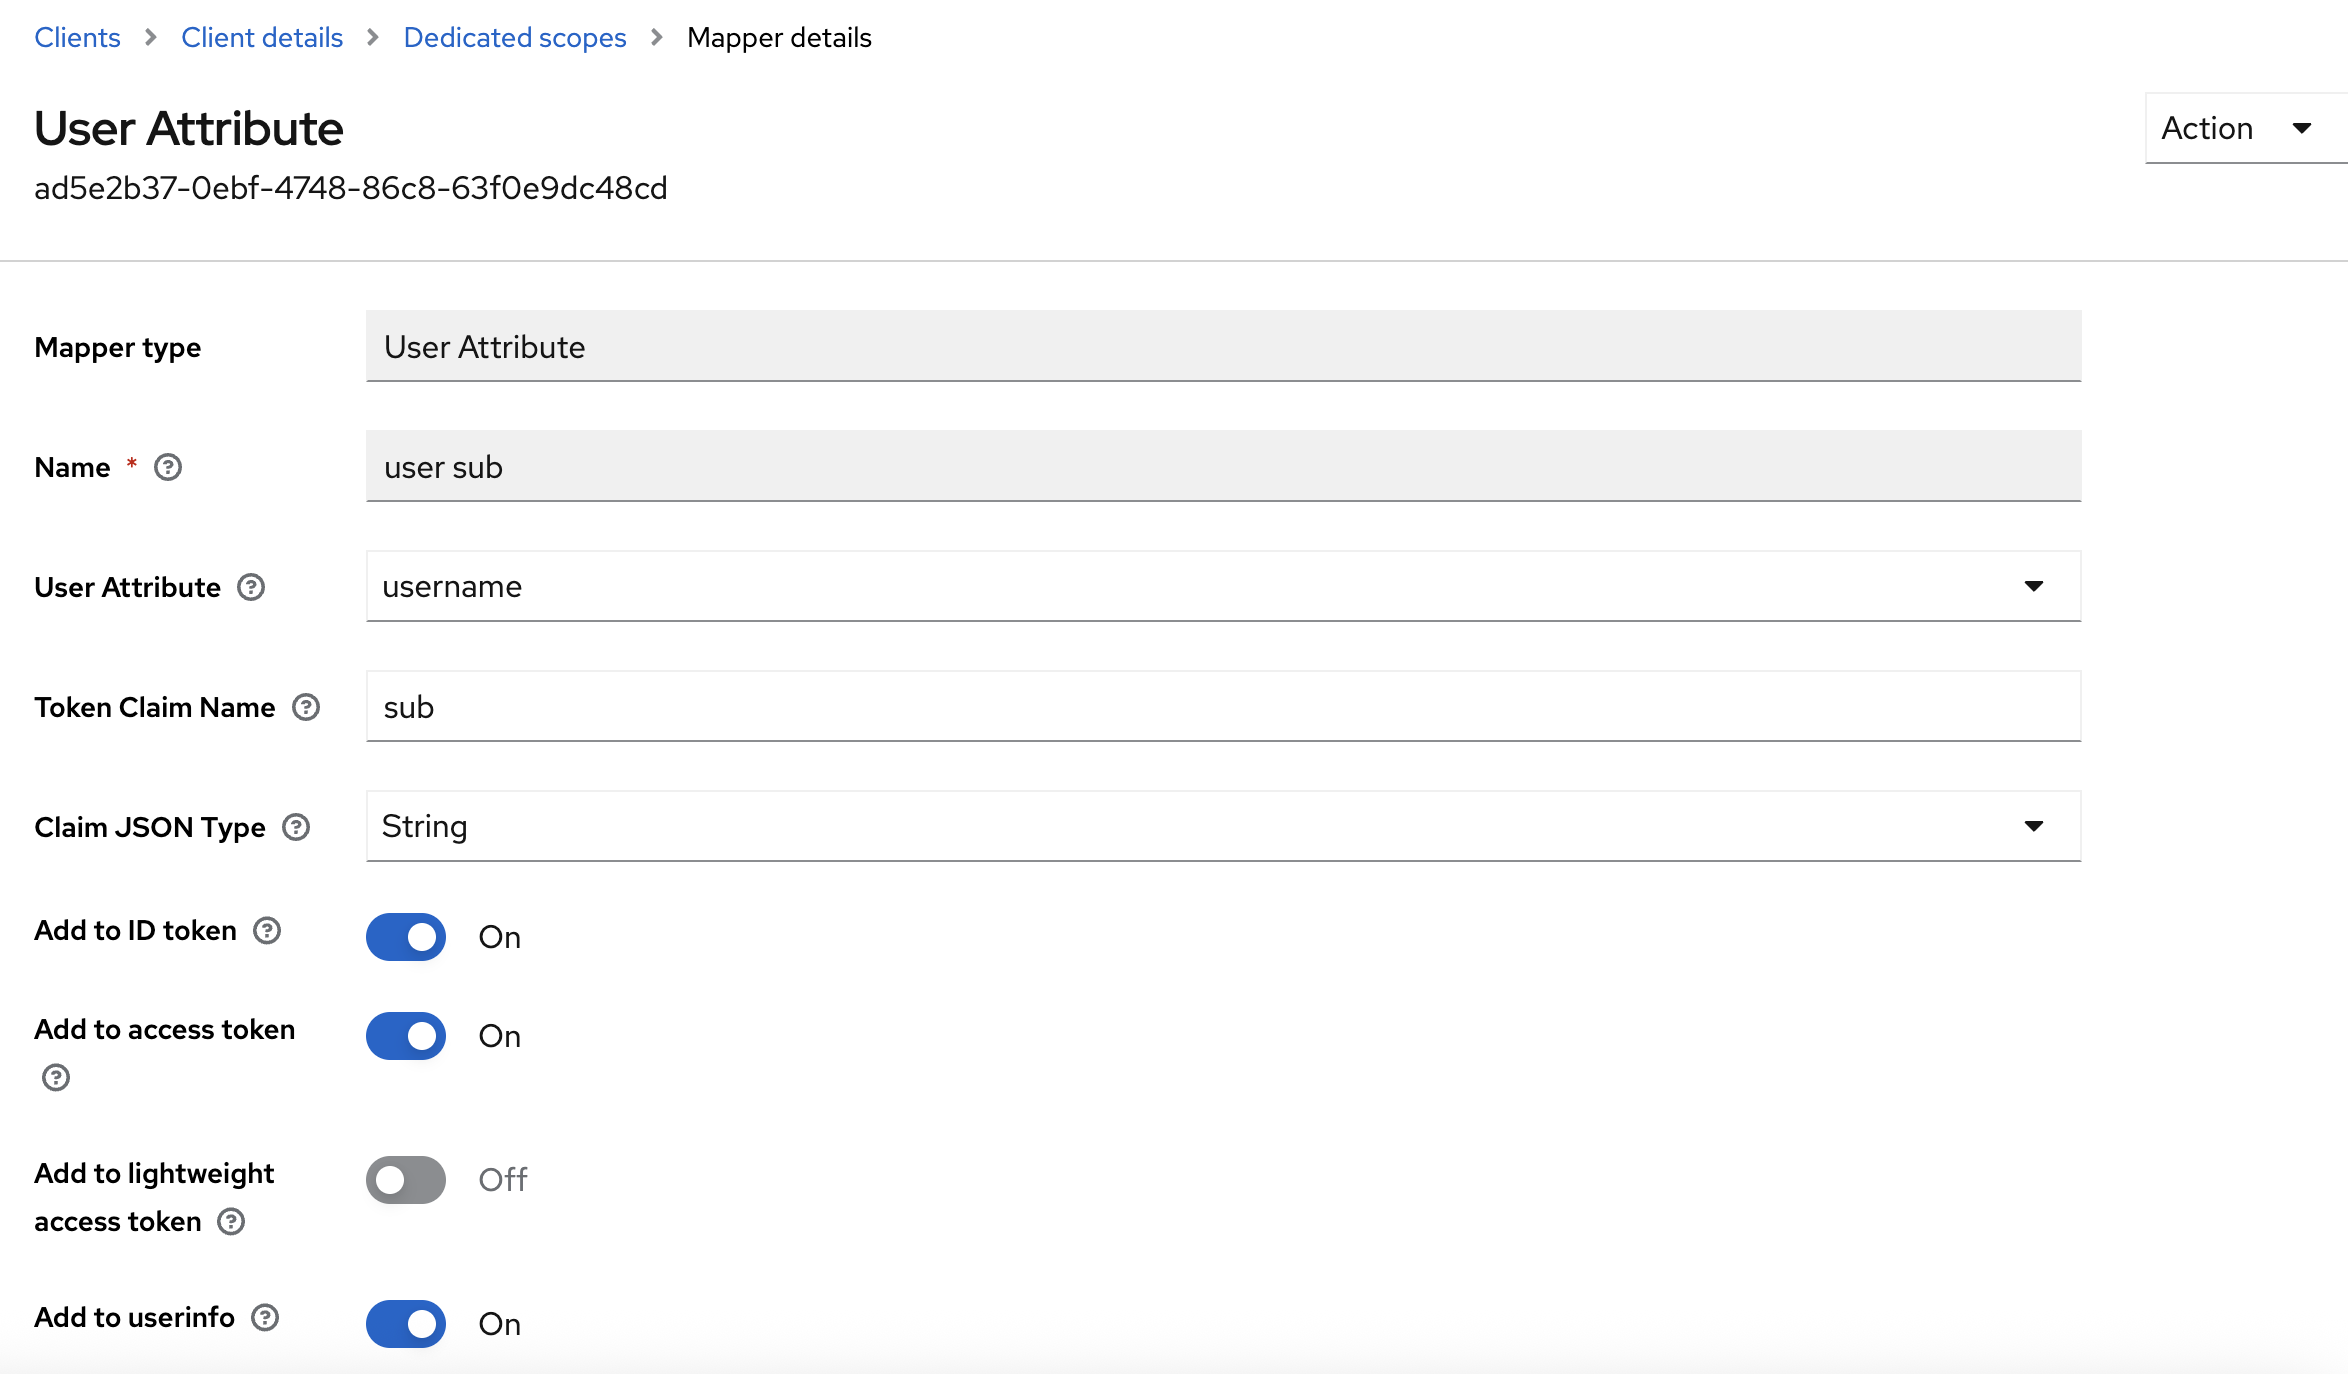
Configure Mappers
-
-
| Refer to the provided screenshots for exact mapper configurations. |
6. Create an A-record in a zone in your domain’s DNS management panel and assign it to the load balancer created upon Traefik or OpenShift installation
Canton Package Manager needs a wildcard record *.<domain>' to expose nodes. All created nodes (domains, participants, applications) will have a <NodeName>.<domainName> address.
For example, in case you are using AWS, follow these steps:
-
Go to the Route53 service.
-
Create a new domain or choose the existing domain.
-
Create an A record.
-
Switch “alias” to ON.
-
In the “Route traffic to” field select “Alias to application and classic load balancer.”
-
Select your region (where the cluster is installed).
-
Select an ELB balancer from the drop-down list.*
|
Choose the ELB balancer, which was automatically configured upon the Traefik chart installation as described in step 3 (or upon OpenShift installation in case of using OpenShift). You can check the ELB by the following command:
|
7. Create a namespace for the Catalyst Package Manager application
kubectl create ns `${ns_name`}where — name of namespace (can be any).${ns_name}
7.1 Get the credentials to the Helm repository in the JFrog artifactory provided by the IntellectEU admin team
|
In case you have any blocker please reach out to catalyst-support@intellecteu.com |
7.2 Add the repo to Helm with the username and password provided
helm repo add catbp-canton-package-manager https://intellecteu.jfrog.io/artifactory/api/helm/catbp-catalyst-package-manager --username ${ARTIFACTORY_USERNAME} --password ${ARTIFACTORY_PASSWORD}As a result: "helm-local" has been added to your repositories
8. Create an ImagePullSecret to access the Catalyst Package Manager deployable images
For example, create this Secret, naming it intellecteu-jfrog-access :
kubectl create secret docker-registry intellecteu-cpm-jfrog-access --docker-server=intellecteu-catbp-docker-cpm.jfrog.io --docker-username=${your-name} --docker-password=${your-password} --docker-email=${your-email} -n ${ns_name}where:
-
${your-name} -
${your-password} -
${your-email} -
${ns_name}
|
In case you want to use a readiness check and use a private repository for the image, you should create a “secret” file with your credentials in Kubernetes for further specifying it in the Helm chart upon Catalyst Package Manager installation. Please refer to the official Kubernetes documentation: kubernetes.io/docs/tasks/configure-pod-container/pull-image-private-registry/ Helm chart configuration instructions you will find here. |
9. Install CPM Daml Contract Templates (Dars)
Once logged into jFrog Artifactory download at
Install cpm-0.1.0.dar to your Canton Participant/Validator
10. Create Participant Party/User via Canton Console
-
Navigate to Participants → Target Participant → Parties → Create Party
-
Enter Display name and Identifier hint
-
Create a new User:
-
-
Navigate to Participants → Target Participant → Users → Create User
-
Match the Username with the Keycloak user:
cpm-${client} -
Set the Primary party to the party created in the previous step
-
Under User rights, grant the user CanActAs right for that party
11. Install CPM Helm Chart
Use the following command:
helm install ${cpm_release_name} catbp/canton-package-manager --values values.yaml -n ${ns_name}where:
-
${cpm_release_name} -
values.yaml — a values file.
-
${ns_name}
You can check the status of the installation by using these commands:
-
helm ls— check the "status" field of the installed chart.
| Status “deployed” should be shown. |
-
kubectl get pods— get the status of applications separately.
| All pods statuses must be “running.” |
kubectl describe pod $pod_name — get detailed information about pods.
Setup
12. Configure helm chart values
Full list of the helm chart values
# -- Domain name where the application will be hosted
domainName: ""
# -- Override for the full release name used in resource names
fullnameOverride: ""

ledger:
  # -- Canton ledger API host address
  host: ""
  # -- Canton ledger API port number
  port: "5001"
  # -- Canton domain identifier
  domainId: ""

mainService:
mainService:
  # -- Override for the main service name
  nameOverride: ""
  # -- Enable or disable the main service
  enabled: true
  # -- Additional environment variables for the main service
  extraEnv: {}
  image:
    # -- Docker image repository
    repository: intellecteu-catbp-docker-cpm.jfrog.io/catbm/canton/cpm/main-service

    # -- Image tag
    tag: ""
    # -- Image pull policy
    pullPolicy: IfNotPresent
  # -- Secrets to use for pulling the image
  imagePullSecrets: []
  # -- Number of replicas
  replicas: 1
  service:
    # -- Kubernetes service type
    type: ClusterIP
    # -- Service port number
    port: 80
    # -- Service port name
    portName: http
    # -- Annotations for the service
    annotations: {}
  # -- Container port to expose
  containerPort: 80
  # -- Custom labels for pods
  labels: {}
  # -- Resource requests and limits
  resources: {}
  # -- Node selector for scheduling
  nodeSelector: {}

listingService:
  # -- Override for the listing service name
  nameOverride: ""
  # -- Enable or disable the listing service
  enabled: false
  # -- URL for the listing service
  listingUrl: ""
  auth:
    keycloak:
      # -- Token endpoint URL
      tokenUrl: ""
      # -- Keycloak client ID
      clientId: ""
      # -- Keycloak client secret
      clientSecret: ""
      externalSecret:
        # -- Enable external secret reference
        enabled: false
        # -- Reference to the remote secret
        remoteSecretRef: ""
        secretStoreRef:
          # -- Name of the secret store
          name: ""
          # -- Kind of the secret store (SecretStore or ClusterSecretStore)
          kind: "SecretStore"
  image:
    # -- Docker image repository
    repository: intellecteu-catbp-docker-cpm.jfrog.io/catbm/canton/cpm/listing-service
    # -- Image tag
    tag: ""
    # -- Image pull policy
    pullPolicy: IfNotPresent
  # -- Secrets to use for pulling the image
  imagePullSecrets: []
  # -- Number of replicas
  replicas: 1
  service:
    # -- Kubernetes service type
    type: ClusterIP
    # -- Service port number
    port: 80
    # -- Service port name
    portName: http
    # -- Annotations for the service
    annotations: {}
  # -- Container port to expose
  containerPort: 80
  # -- Additional environment variables for the listing service
  extraEnv: {}
  # -- Custom labels for pods
  labels: {}
  # -- Resource requests and limits
  resources: {}
  # -- Node selector for scheduling
  nodeSelector: {}

# UI component values
ui:
  # -- Override for the ui name
  nameOverride: ""
  # -- number of ui pods to run
  replicaCount: 1
  # -- api image settings
  image:
    repository: intellecteu-catbp-docker-cpm.jfrog.io/catbm/canton/cpm/cpm-ui
    pullPolicy: IfNotPresent
    # defaults to appVersion
    tag: ""
  # -- api image pull secrets
  imagePullSecrets: []
  #   - name: ""
  # -- extra env variables for ui pods
  extraEnv: {}
  # -- labels for ui pods
  labels: {}
  # -- api service port and name
  service:
    port: 80
    portName: http
  # -- annotations for api pods
  podAnnotations: {}
  # -- securtiry context on a pod level
  podSecurityContext:
  #   runAsNonRoot: true
  #   runAsUser: 4444
  #   runAsGroup: 5555
  #   fsGroup: 4444
  # -- security context on a container level
  securityContext: {}
  # Define update strategy for UI pods
  updateStrategy: {}
  # -- CPU and Memory requests and limits
  resources: {}
  #   requests:
  #     cpu: "100m"
  #     memory: "50Mi"
  #   limits:
  #     cpu: "200m"
  #   memory: "200Mi"
  # -- Specify Node Labels to place api pods on
  nodeSelector: {}
  # -- https://kubernetes.io/docs/concepts/scheduling-eviction/taint-and-toleration/
  tolerations: []
  # -- https://kubernetes.io/docs/concepts/scheduling-eviction/assign-pod-node/#node-affinity
  affinity: {}
  # -- keycloak client secret is used to get token from keycloak (set in env-specific values)
  keycloakClient:
    id: ""

ingressConfig:
  # Enable the creation of Ingress resources
  enabled: false
  # Select the ingress provider (supported: traefik, traefikCRD)
  provider:
    name: traefikCRD
    traefik:
      # Ingress class name to use when provider is "traefik"
      ingressClass: ""
    traefikCRD:
      tlsStore:
        # Enable or disable creation of TLSStore
        enabled: false
        # Name of the TLSStore to be used (default by Traefik)
        name: default

  # Ingress class name to be applied to all ingress resources
  className: traefik

  # Annotations for ingress routes
  annotations: {}

  # List of domains
  hosts:
    - host: ""

  # TLS configuration options
  tls:
    # Enable or disable TLS for ingress
    enabled: false
    # Name of the existing secret with TLS certs (ignored if certManager is enabled)
    secretName: ""
    certManager:
      # Enable automatic certificate management using Cert-Manager
      enabled: true
      # Email to use for Let's Encrypt registration
      email: services.cat-bp@intellecteu.com
      # ACME server URL (production or staging)
      server: https://acme-v02.api.letsencrypt.org/directory

  # Middleware configuration to strip path prefixes before routing
  stripApplicationPrefix:
    enabled: true
    type: regex
    # List of regex patterns to remove from the request path
    regex:
      - "^/[^/]+/api/"
13. Install CPM CLI client
Create a configuration file containing a JSON object with the following keys:
-
authUrl:Device Authorization Endpoint of your OAuth 2.0 provider. -
tokenUrl:Token Endpoint of your OAuth 2.0 provider. -
authClientId:The client id to use when obtainaing an access token. -
listingUrl:The URL of the listing service to use. -
mainUrl:The URL of your main service.
Example:
{
    "authUrl": "https://YOUR_KEYCLOAK/auth/realms/YOUR_REALM/protocol/openid-connect/auth/device",
    "tokenUrl": "https://YOUR_KEYCLOAK/auth/realms/YOUR_REALM/protocol/openid-connect/token",
    "authClientId": "cpm-cli",
    "listingUrl": "https://canton.catalyst.intellecteu.com/cpm-listing-service/api",
    "mainUrl": "https://your-main-service"
}|
You can then run the cpm cli as or to make things a bit nicer use the following snippets to create a Unix (bash/zsh) Windows (powershell) |
13. Configure CLI
-
Configure mainnet-helper.sh:
helper.sh
#!/bin/bash

# Define endpoint, user and parties
export PUBLISHER_TOKEN_URL="https://{keycloak_url}/auth/realms/${realm}/protocol/openid-connect/token"
export PUBLISHER_USER="cpm-${client}"
export PUBLISHER_PARTY="${party_id}"
export IEU_LISTER_PARTY=IEU::1220e2a179be15928ce0b551c069faaa2b8e521fd9c601b59752b82842790695caa0

get_token() {
    local url="$1"
    local user="$2"
    local pass="$3"

    local response=$(curl -s -X POST "$url" \
        -H 'Content-Type: application/x-www-form-urlencoded' \
        -d 'client_id=cpm-cli' \
        -d "username=$user" \
        -d "password=$pass" \
        -d 'grant_type=password')

    if ! token=$(jq -r '.access_token' <<< "$response" 2>/dev/null) || [[ "$token" == "null" ]]; then
        echo "ERROR: Failed to fetch token for user '$user'. Response:" >&2
        echo "$response" >&2
        return 1
    fi

    echo "$token"
}

printf "Enter password for %s user: " "$PUBLISHER_USER"
read -s pass
echo
if ! TOKEN_PUBLISHER=$(get_token "$PUBLISHER_TOKEN_URL" "$PUBLISHER_USER" "$pass"); then
    unset pass
    return 1
fi
unset pass

export TOKEN_PUBLISHER
echo "Token exported successfully. You can now run CPM CLI commands."

function cpm() {
    java -jar target/cli-0.2.1-all.jar --config-file config/mainnet.json "$@"
}-
Configure cpm-config.json:
-
Place the file in the config/ directory
-
cpm-config.sh
{
  "authUrl": "https://${keycloak_url}/auth/realms/${realm}/protocol/openid-connect/auth/device",
  "tokenUrl": "https://${keycloak_url}/auth/realms/${realm}/protocol/openid-connect/token",
  "listingUrl": "https://cantonapps.com/cpm-listing-service/api",
  "mainUrl": "https://${cpm_url}/cpm-main-service/api"
}-
Download CLI JAR
-
Download
cli-${version}-all.jar -
Place the file in the
target/ directory
-
14. Verify Installation
-
Run helper.sh:
source mainnet-helper.sh
Enter password for cpm-${client} user-
Run the CPM CLI commands:
# List published apps
cpm list

# Publish a sample app
cpm --access-token $TOKEN_PUBLISHER publish \
    $PUBLISHER_PARTY ${app_hash} ${app_name} ${app_version} \
    $IEU_LISTER_PARTY "${app_description}"